Iiiiiit's... hipster time!
Hello everyone, welcome to another Mass Effect 3 multiplayer guide. You know, according to Eric Fagnan's recent gameplay stats, one of the least played characters on Gold/Platinum is the Human Sentinel, with a pitiful 0.60% play rate. So let's show our BroSent/FemSent some love!
Human Sentinel
Tech Armor: 4-durability, 5-power damage, 6-durability
Warp: 4-detonate, 5-expose, 6-pierce
Throw: 4-force, 5-detonate, 6-force & damage
Alliance Training: N/A
Fitness: 4-durability, 5-shield recharge, 6-fitness expert
I've tried a few weapons on this character, but in general, you can't go wrong with Collector SMG/Acolyte. You have something for shields, something for armor. Both are good at priming ammo effects. You have some crowd control and some raw DPS. You simply cannot go wrong with this combo.
I have to insist upon Incendiary ammo for this build, and not just because of Warp/Incendiary cheese. It's about comprehensive synergy with the character. For example, I know many people would be inclined to take Warp ammo. The thing is, you have only one priming power (Warp), and it's a projectile power - not reliable for biotic priming like Dark Channel or Reave. On the other hand, you have two triggering powers (Warp and Throw), making the HSentinel great at setting off ammo effects, and you can't set off Warp ammo.
Really, Disruptor ammo isn't a bad choice either because it helps out against shields, but I figure that it is more "disruptive" (pardon the pun) to a biotic team than Incendiary ammo. Nobody likes when their biotic explosion is overridden by a puny tech burst. They don't seem to mind fire explosions though, for whatever reason. Maybe they're more satisfying. So Disruptor is something you could use if you run out of Incendiary ammo.
Gear isn't a big deal with this character. Sentinels are very much the jack-of-all-trades class, so you can choose to be more tanky, take more SMG damage, more pistol damage, or use a Geth Scanner for tactical awareness. Whatever floats your boat.
Tech Armor: I go for all durability and power synergy. Power synergy isn't so important since it doesn't affect biotic explosions, but it's not like you're going to take melee damage. It gives you a convenient 30% force bonus, just enough to buff Throw to 1500N, which let's you stagger bosses on Gold. With a Cyclonic Modulator and 50% damage reduction, you'll be surprisingly tanky... for a human.
Warp: I've been trying out non-standard Warp evolutions, namely all top-row evolutions, but I have to go with the standard Warp for this build. You get the biotic explosion bonus. You get the debuffing. You get the armor weakening bonus. All of those are essential, in my assessment. Although your biotic explosions are slow, they are very powerful if you take all the detonate evolutions, only rivaled by the Warp/Shockwave combo (And technically the Pull/Shockwave combo, but really, nobody does that). And that's what makes them worth the time at all - the massive damage.
Expose is useful for debuffing bosses because as a Sentinel, you are relying on your weapons for much of the work. Then I had a debate with myself (involving a lot of yelling and fist-shaking) whether Pierce was really all that useful on this build since I run the CSMG with the high-velocity barrel, which negates most of enemy armor anyway. I concluded that even though Pierce may not have much effect on your weapon's effectiveness against armor, it does a bit more damage against both barriers and armor. This is important for the Warp/Incendiary cheese because the glitch "absorbs" the damage properties of Warp. From my understanding, the more damage Warp does to barriers and armor, the more damage the glitch does to barriers and armor (this is all put simply, as I'm not sure I fully understand the glitch).
In that light, you could argue for taking the entire top row of Warp. However, I didn't build this character around the Warp/Incendiary glitch. If I had, I would have used the Reegar. Even then, this character would still be inferior to the ultra-cheesy Krogan Soldier build. As it is, I consider it a slight bonus and nothing more.
Throw: This is your trigger power, used for detonating fire and biotic explosions. Thanks to Tech Armor, it has 1500N of force, enough to stagger bosses on Gold. This is quite useful if you turn a corner and a Geth Prime is staring you in the face. And you can always use it to send mooks flying off their feet.
Passive: I skipped this because you have enough power force with Tech Armor, power damage is largely irrelevant on this build, and because your weapons are light enough that you don't need more weight capacity. The weapon damage bonuses can be made up for with consumables/gear.
Fitness: I maxed out durability because I wanted this character to have a bit more health/shields to take advantage of that 50% damage reduction. Think of it this way: a car that gets 50mpg but only holds one gallon of gas still only goes 50 miles. The more gas in the tank, the more you can take advantage of that mileage. Same goes for your health and shields.
Strategy: The Human Sentinel has a lot of tools at his/her disposal, and that's what makes it such a fun character (though admittedly, half of it comes from your weapon choice). Keep Tech Armor on at all times, unless of course detonating it could save your life. Swarmers are dangerous, too! Use Throw at your discretion to stagger/ragdoll a target, or to force a dodge. It goes without saying, make liberal use of fire and biotic explosions.
So when you're up against unshielded mooks, you can knock them to the ground with Throw. Or you can stun them with the Acolyte and then use Throw for a fire explosion. Easy.
Use Throw to get Husks and especially Abominations out of your way.
Shielded mooks are best dealt with using the Acolyte/Throw combo. You don't want to leave these enemies on their feet - A Marauder with a Phaeston CXXVII is always a threat.
When facing armored enemies - bricks, as I sometimes call them - debuff them with Warp and chip away their armor with the CSMG. The Warp/Incendiary glitch should accelerate the damage. Use your fire and biotic explosions all the time. For Dragoon mobs, use your CSMG and Throw from a distance to keep them dodging. When you get a chance, Warp one of them and set off the biotic explosion. Watch them melt like butter.
For shield/armor enemies, Acolyte first, then Warp, then Throw. Pretty easy.
When you're up against Phantoms, use your Acolyte to strip their shields. She'll dodge and give you the opportunity to use Throw, triggering a fire explosion and knocking her off her feet. Finish her off with the Acolyte. Cake.
For bosses, use Warp for the debuff. Use your Acolyte to strip away shields, use your Collector SMG and Warp against armor. Make use of the Warp/Incendiary glitch, fire and biotic explosions. Try not to let bosses command your attention, as the Human Sentinel is not much of a boss killer - not that it's bad at killing bosses. Focus on the smaller enemies and you'll be more efficient.
That's about it. As always, thanks for reading and stay tuned for more Mass Effect 3 multiplayer guides and stuff. Stay classy.
-Grun7mas7er
Caineghis and Disciple brave ***$$$THE THUNDERDOME$$$*** with Human Sentinels.
Showing posts with label Sentinel. Show all posts
Showing posts with label Sentinel. Show all posts
Friday, May 10, 2013

Wednesday, October 24, 2012
Asari Valkyrie Sentinel: 200 Waves Edition
Hello appreciated readers. So apparently the balance changes were delayed yesterday and for some reason that also delayed the new character. So turns out that the new "highly requested" character is the Asari Valkyrie Sentinel. Coincidentally, that was the one that I made a reference to in my Krogan Shaman guide. Hmm.
This is an updated guide to the Asari Valkyrie Sentinel. I've noticed that my Valkyrie guide has grown to be my most-searched and most-viewed post, and I suspect that this is because the Valkyrie is still an enigma for many players, even some of the experts. So I looked around, and after browsing for Valkyrie guides by some prominent ME3 players, I haven't found any of them to be particularly agreeable except for Ashen Earth's Valkyrie post on BSN. From what I see, Ashen showcases a high-risk high-reward play style that emphasizes the Valkyrie as a close-range fighter, using Warp and Annihilation Field debuffs (30% total) to melt bosses, in this case a Banshee. This is what I consider to be a masterful way to use the Valkyrie's strengths, and I would not recommend forgoing this capability.
 Asari Valkyrie
Tech Armor: 4-durability
Annihilation Field: 4-impact radius, 5-damage taken, 6-drain
Warp: 4-detonate, 5-expose, 6-pierce
Asari Adept: 4-damage & capacity*, 5-headshots, 6-weapon damage
Fitness: 4-durability
I recommend using Warp ammo. You can also use Incendiary ammo if you wish to take advantage of the Warp-Incendiary exploit.
It is necessary to have a weapon capable of sustained high damage-per-second. This includes the Harrier, Reegar, Piranha, and Hurricane. Unfortunately, if you lack these weapons this build will not be nearly as effective. Since these weapons tend to have restrictions (range and/or spare ammo), you may choose to take a sidearm for ranged combat if your cooldown permits. A good pistol or SMG should do the trick.
It's acceptable to mix-and-match this build a little to suit your play style, but I would refrain from speccing Annihilation Field and Warp differently, since they suit virtually any build. What I have attempted to achieve with this build is a) maximize damage output, and b) improve durability. By replacing evolution 5 and 6 of Tech armor with 4 ranks in Fitness, the Valkyrie gains some durability at the cost of some power damage. Since this is a close-range, weapon-based build, I think that this is a fair trade. With durability in rank 4, you still get 40% damage reduction.
I find that I have had the most success with Annihilation Field specced as above. The impact radius evolution allows you to prime biotic explosions from further away. It also allows you to incapacitate unprotected enemies from farther away, rendering them harmless at close range. Finally, it has synergy with the damage taken and drain evolutions, allowing you to debuff enemies and leech their shields from slightly greater distances. In some cases, this can be a lifesaver. And if you get backed into a corner by Phantoms, you can detonate AF to stagger them, giving you a chance to get out of there.
This build uses the 'standard Warp'. Detonate is useful for your own AF-Warp combos, as well as for priming/triggering a teammate's BE. Expose is key to success with this build, since it offers an additional 15% debuff against warped targets. Combined with Annihilation Field, affected targets take 30% additional damage. Finally, pierce is useful against armored targets, making their armor damage reduction less of an issue.
Depending on your load out, you have a choice between weapon damage or damage & capacity. If you want to have a sidearm for ranged combat, or simply just have one heavy weapon, I recommend taking capacity to keep a reasonable cooldown (preferably around 100%). Otherwise, take the additional weapon damage. I take headshots for even more damage output. Finally, I take weapon damage for rank 6 because this is a weapon build, after all.
Then for Fitness, I take 4 ranks of durability, which gives you roughly 1167 health/1167 shields with Tech Armor active, or 1167/2417 with a Cyclonic Mod IV. Along with the drain evolution to keep your shields up, this Asari is durable enough for close quarters combat.
Basically, your strategy is to first throw a Warp to debuff the enemy, get up close and further debuff the enemy with Annihilation Field, then let loose with your high-dps weapon. Note that using Warp to trigger a biotic explosion will not give you the Warp debuff, which is why it is important to use Warp before you get in range. If you're using Warp ammo, you'll do even more damage against targets affected by biotics. If you're using Incendiary ammo, warped targets take exponentially more damage over time from burning damage. Either way, you'll be dropping even the toughest of enemies like flies.
You aren't as durable as other characters, though, so use drain to keep yourself alive. If it's too dangerous to get up close, use your sidearm if you have one. There's no need to bum-rush every enemy you see. Pro-tip: if you're on an incline, don't be afraid of sync-kills. As long as you're not on an even level as the enemy (Banshee, Phantom, etc), they cannot sync-kill you. For example, if you are on a staircase and a Banshee is above or below you, you cannot be grabbed unless you are side-by-side on the same stair. Use this trick to your advantage against bosses whenever possible.
Thanks for reading, and I hope that this guide helps with your game. If you did find it helpful, consider leaving a 'like' below. If you've gotten help from several guides on this blog, consider subscribing and all that jazz. Have fun with the build and take care.
-Grun7mas7er
Watch Feneckus demonstrate the power of the Valkyrie.
This is an updated guide to the Asari Valkyrie Sentinel. I've noticed that my Valkyrie guide has grown to be my most-searched and most-viewed post, and I suspect that this is because the Valkyrie is still an enigma for many players, even some of the experts. So I looked around, and after browsing for Valkyrie guides by some prominent ME3 players, I haven't found any of them to be particularly agreeable except for Ashen Earth's Valkyrie post on BSN. From what I see, Ashen showcases a high-risk high-reward play style that emphasizes the Valkyrie as a close-range fighter, using Warp and Annihilation Field debuffs (30% total) to melt bosses, in this case a Banshee. This is what I consider to be a masterful way to use the Valkyrie's strengths, and I would not recommend forgoing this capability.
 Asari Valkyrie
Tech Armor: 4-durability
Annihilation Field: 4-impact radius, 5-damage taken, 6-drain
Warp: 4-detonate, 5-expose, 6-pierce
Asari Adept: 4-damage & capacity*, 5-headshots, 6-weapon damage
Fitness: 4-durability
I recommend using Warp ammo. You can also use Incendiary ammo if you wish to take advantage of the Warp-Incendiary exploit.
It is necessary to have a weapon capable of sustained high damage-per-second. This includes the Harrier, Reegar, Piranha, and Hurricane. Unfortunately, if you lack these weapons this build will not be nearly as effective. Since these weapons tend to have restrictions (range and/or spare ammo), you may choose to take a sidearm for ranged combat if your cooldown permits. A good pistol or SMG should do the trick.
It's acceptable to mix-and-match this build a little to suit your play style, but I would refrain from speccing Annihilation Field and Warp differently, since they suit virtually any build. What I have attempted to achieve with this build is a) maximize damage output, and b) improve durability. By replacing evolution 5 and 6 of Tech armor with 4 ranks in Fitness, the Valkyrie gains some durability at the cost of some power damage. Since this is a close-range, weapon-based build, I think that this is a fair trade. With durability in rank 4, you still get 40% damage reduction.
I find that I have had the most success with Annihilation Field specced as above. The impact radius evolution allows you to prime biotic explosions from further away. It also allows you to incapacitate unprotected enemies from farther away, rendering them harmless at close range. Finally, it has synergy with the damage taken and drain evolutions, allowing you to debuff enemies and leech their shields from slightly greater distances. In some cases, this can be a lifesaver. And if you get backed into a corner by Phantoms, you can detonate AF to stagger them, giving you a chance to get out of there.
This build uses the 'standard Warp'. Detonate is useful for your own AF-Warp combos, as well as for priming/triggering a teammate's BE. Expose is key to success with this build, since it offers an additional 15% debuff against warped targets. Combined with Annihilation Field, affected targets take 30% additional damage. Finally, pierce is useful against armored targets, making their armor damage reduction less of an issue.
Depending on your load out, you have a choice between weapon damage or damage & capacity. If you want to have a sidearm for ranged combat, or simply just have one heavy weapon, I recommend taking capacity to keep a reasonable cooldown (preferably around 100%). Otherwise, take the additional weapon damage. I take headshots for even more damage output. Finally, I take weapon damage for rank 6 because this is a weapon build, after all.
Then for Fitness, I take 4 ranks of durability, which gives you roughly 1167 health/1167 shields with Tech Armor active, or 1167/2417 with a Cyclonic Mod IV. Along with the drain evolution to keep your shields up, this Asari is durable enough for close quarters combat.
Basically, your strategy is to first throw a Warp to debuff the enemy, get up close and further debuff the enemy with Annihilation Field, then let loose with your high-dps weapon. Note that using Warp to trigger a biotic explosion will not give you the Warp debuff, which is why it is important to use Warp before you get in range. If you're using Warp ammo, you'll do even more damage against targets affected by biotics. If you're using Incendiary ammo, warped targets take exponentially more damage over time from burning damage. Either way, you'll be dropping even the toughest of enemies like flies.
You aren't as durable as other characters, though, so use drain to keep yourself alive. If it's too dangerous to get up close, use your sidearm if you have one. There's no need to bum-rush every enemy you see. Pro-tip: if you're on an incline, don't be afraid of sync-kills. As long as you're not on an even level as the enemy (Banshee, Phantom, etc), they cannot sync-kill you. For example, if you are on a staircase and a Banshee is above or below you, you cannot be grabbed unless you are side-by-side on the same stair. Use this trick to your advantage against bosses whenever possible.
Thanks for reading, and I hope that this guide helps with your game. If you did find it helpful, consider leaving a 'like' below. If you've gotten help from several guides on this blog, consider subscribing and all that jazz. Have fun with the build and take care.
-Grun7mas7er
Watch Feneckus demonstrate the power of the Valkyrie.
Sunday, September 16, 2012
ME3 Character Guide: Turian Sentinel
http://kalence.drupalgardens.com/me3-builder#43!1D01565!!244513!6FEE3
Hello readers. While we're on the subject of Turians, I thought I'd make a guide for the Turian Sentinel. I have to say that this was probably my favorite class at launch. It's an extremely versatile character and as such, there are many ways to build it. Because of this, I will actually be going over two different builds that seem to be popular among advanced players.
Hello readers. While we're on the subject of Turians, I thought I'd make a guide for the Turian Sentinel. I have to say that this was probably my favorite class at launch. It's an extremely versatile character and as such, there are many ways to build it. Because of this, I will actually be going over two different builds that seem to be popular among advanced players.
Tech Armor: 4-damage & radius*, 5-power damage, 6-durability
Warp: 4-damage, 5-expose, 6-pierce
Overload: N/A
Turian Veteran: 4-damage & capacity, 5-power damage, 6-damage & stability
Fitness: 4-durability, 5-shield recharge, 6-fitness expert
As the name suggests, this build is best against Reapers, but is also serviceable against Cerberus and Geth with a change of weapons. The general purpose of this build is to be a support class by using Warp to debuff enemies. Warp is a fantastic power because it makes any team better. It primes and triggers biotic explosions, triggers tech bursts, and weakens enemy armor for weapon classes to take down. I would not recommend skipping Warp if you are playing on higher difficulties, and same goes for the expose and pierce evolutions.
The other strength of the Turian Sentinel is his tankiness. Not only does he have pretty good shields (thanks to the recent buff), but Tech Armor gives an extra 35%-50% damage reduction, based on how you choose to evolve it. For the Reaper Slayer build, I choose damage & radius because detonations are good for getting husks and swarmers out of your way. The extra 5% damage reduction is nice, but pretty negligible. Tech Armor also gives you a 30% power damage bonus, which is nice.
I said on the Turian Soldier guide that Turians should take advantage of weapon damage and stability evolutions but for the T. Sentinel it's acceptable to choose damage & capacity since it has a significant effect on your cooldown time. Even then you still have the same weapon damage bonus as a wimpy Salarian (no offense, Salarians).
Then you have your Fitness spec'd for shields and health. Nothing new there.
Here's a video for your enjoyment. Thanks to Stardusk for the insight.
General purpose build
Tech Armor: 4-durability, 5-power damage, 6-durability
Warp: 4-damage, 5-expose, 6-pierce
Overload: 4-chain overload, 5-recharge speed*, 6-shield damage
Turian Veteran: 4-damage & stability
Fitness: 4-durability
The strategy is basically the same except that you now have Overload to help deal with shielded targets. There is an option between recharge speed and neural shock depending on your play style. Neural shock will cause unprotected enemies to fall to the ground for a short time, which can be useful, but is a hindrance if you want to line up headshots. That's why I would choose recharge speed, personally.
Choose a good all-around weapon that can take on mobs and bosses. Weight isn't too much of an issue here since you will be using powers in between shots, rather than shooting in between powers. The Turian doesn't have a lot of power damage bonuses either, which is even more of a reason to bring a good weapon along. Use Overload to drain shields and stun weaker enemies, then finish them off with your gun. Use Warp for the big armored enemies. But above all, remember that Turians are good with guns.
Special thanks to zHHk for the gameplay footage below.
That just about wraps it up. Hopefully this guide is helpful and we'll see more Turians out on the battlefield. Thanks for reading and take care.
-MACave11i
Here's a video for your enjoyment. Thanks to Stardusk for the insight.
General purpose build
Tech Armor: 4-durability, 5-power damage, 6-durability
Warp: 4-damage, 5-expose, 6-pierce
Overload: 4-chain overload, 5-recharge speed*, 6-shield damage
Turian Veteran: 4-damage & stability
Fitness: 4-durability
The strategy is basically the same except that you now have Overload to help deal with shielded targets. There is an option between recharge speed and neural shock depending on your play style. Neural shock will cause unprotected enemies to fall to the ground for a short time, which can be useful, but is a hindrance if you want to line up headshots. That's why I would choose recharge speed, personally.
Choose a good all-around weapon that can take on mobs and bosses. Weight isn't too much of an issue here since you will be using powers in between shots, rather than shooting in between powers. The Turian doesn't have a lot of power damage bonuses either, which is even more of a reason to bring a good weapon along. Use Overload to drain shields and stun weaker enemies, then finish them off with your gun. Use Warp for the big armored enemies. But above all, remember that Turians are good with guns.
Special thanks to zHHk for the gameplay footage below.
That just about wraps it up. Hopefully this guide is helpful and we'll see more Turians out on the battlefield. Thanks for reading and take care.
-MACave11i
Wednesday, August 22, 2012
N7 Paladin Sentinel: Master Level
Greetings, esteemed readers. This is an updated guide to the N7 Paladin Sentinel. I have noticed that the Paladin is seeing something of a rebirth as what some BSN-ites might call a "hipster" character (I have seen posts where people claim that they liked the Paladin before it was cool, whatever that means). The reason that I have decided to remake this guide is because a) several critical details about the Paladin have recently come to my attention, b) I have been using the Earth characters as of late, and c) the Paladin is still one of my most-viewed guides, and I assume that this is because he remains an enigmatic character in the mainstream.
 N7 Paladin
Energy Drain: 4-damage, 5-drain, 6-armor boost
Incinerate: 4-damage, 5-burning damage, 6-freeze combo
Snap Freeze: 4-reach, 5-cryo explosion, 6-damage & weakness
N7 Paladin: 4-damage & capacity*
Shield Mastery: 4-durability*
*N7 Paladin training can be skipped and replaced with shield recharge and fire shield, as explained later in the guide.
I recommend using elemental ammo for more tech explosions. Just about any lightweight weapon will do. I would aim for a 150%+ recharge speed.
Despite having some of the most advanced omni-tool technology -- the omni-shield -- the Paladin isn't a durable character. He's much more similar to an Engineer than his tankier Sentinel counterparts. For this reason, I recommend taking Energy Drain to give your durability a boost. I take damage to make it somewhat useful against heavily-shielded enemies. Next I take drain to fully restore my shields. I don't know why you would take recharge speed anyway. Finally, I take the controversial armor boost evolution. Supposedly, the damage reduction does work off-host, even though the visual effect doesn't. I have heard both sides saying that it does or doesn't work. If you have doubts, you can always just host when you want to use this build.
For Incinerate, I would have liked radius if it could trigger multiple tech explosions, but it cannot, so I go with damage. For evolution 5, I can actually justify both evolutions. Burning damage will give you better damage against hard targets, which is good on higher difficulties. But if you prime a group of enemies with Snap Freeze, having recharge speed will allow you to trigger each cryo explosion faster (since you have to trigger each individually). Seeing that recharge speed evolution has a rather insignificant effect on the total recharge speed, I would generally go with burning damage. Finally, I take freeze combo since the Snap Freeze-Incinerate combo is this build's signature move.
Speaking of that combo, let's move on to Snap Freeze. I take reach to give it some extra range, and the 15m range is actually greater than the animation would have you think. I take cryo explosion because the debuff is useful against all enemies, and because I make liberal use of Snap Freeze with this build so duration is unnecessary. Finally, I take damage & weakness, but there's a catch. Tech combo is what you're really looking for with this build because Snap Freeze primes shielded, armored, and unprotected targets for Cryo Explosions (unlike Cryo Blast which only primes unprotected targets). You'll be chaining Cryo Explosions like crazy, and so the extra 100% damage seems like the natural choice. However, this extra 100% damage is inherent to Snap Freeze, likely the result of a glitch. Basically, you get both evolution 6 perks with this build, allowing you to debuff armor and create powerful tech explosions.
This build works extremely well with a Novaguard or a Slayer. Have the host play as one of these Vanguards while one or more players use the Paladin and spam Snap Freeze. The Vanguard can use Biotic Charge, Nova, and/or Phase Disruptor to trigger Cryo explosions. If done correctly, you'll unleash an endless chain of Cryo explosions on your enemies.
The main purpose of your passive abilities is capacity, since a good cooldown is key to this build. However, you can choose to mix and match a little if you prefer. For Shield Mastery, I take durability as the obvious choice. If you think you need the extra shield recharge speed, swap out rank 4 of your passive. If you want to take Fire Shield for melee tech combos, which is actually quite viable, then you can completely forgo N7 Paladin training.
The great thing about having fire shield is that your shield bash will prime the target for a fire explosion that can be immediately triggered with one of your powers (preferably Incinerate or Energy Drain, as Snap Freeze will cause the Fire Explosion to detonate on your character). Think of this combo like the Fury's Annihilation Field-Throw combo. Fire shield has no priming cooldown, so if you have a teammate triggering your fire explosions, just keep bashing the target and watch the fireworks.
I have heard about a lot of bugs surrounding this character, and so Tech combos may not always work as intended. For example, any tech combo triggered by Snap Freeze will detonate on your character because of the game mechanics (the explosion detonates on you because Snap Freeze is centered from your character). For the record, cryo shield does not weaken enemy armor as intended. However, it can freeze Phantoms solid. That could potentially be fun. Pro-tip: your heavy and light melee can block damage. Try timing your light melee against a Banshee warp if you want to feel like a total badass.
Completely outdated, unnecessary, and tasteless quote from the old guide:
"With the Snap Freeze/cryo shield combo, even the toughest of armored enemies are stripped of their protection and left naked and whimpering in the harsh cold.The Paladin is so cold that he makes Miranda (a.k.a. Ice Queen Bitch) look hotter than a swimsuit model in the tropics... Although she is known for wearing swimwear into battle. Hm... it made sense when I first came up with it. All of a sudden this paragraph looks somewhat risqué."
Platinum gameplay brought to you by INVADERONE.
Gameplay by Stentron.
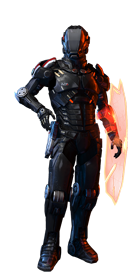 N7 Paladin
Energy Drain: 4-damage, 5-drain, 6-armor boost
Incinerate: 4-damage, 5-burning damage, 6-freeze combo
Snap Freeze: 4-reach, 5-cryo explosion, 6-damage & weakness
N7 Paladin: 4-damage & capacity*
Shield Mastery: 4-durability*
*N7 Paladin training can be skipped and replaced with shield recharge and fire shield, as explained later in the guide.
I recommend using elemental ammo for more tech explosions. Just about any lightweight weapon will do. I would aim for a 150%+ recharge speed.
Despite having some of the most advanced omni-tool technology -- the omni-shield -- the Paladin isn't a durable character. He's much more similar to an Engineer than his tankier Sentinel counterparts. For this reason, I recommend taking Energy Drain to give your durability a boost. I take damage to make it somewhat useful against heavily-shielded enemies. Next I take drain to fully restore my shields. I don't know why you would take recharge speed anyway. Finally, I take the controversial armor boost evolution. Supposedly, the damage reduction does work off-host, even though the visual effect doesn't. I have heard both sides saying that it does or doesn't work. If you have doubts, you can always just host when you want to use this build.
For Incinerate, I would have liked radius if it could trigger multiple tech explosions, but it cannot, so I go with damage. For evolution 5, I can actually justify both evolutions. Burning damage will give you better damage against hard targets, which is good on higher difficulties. But if you prime a group of enemies with Snap Freeze, having recharge speed will allow you to trigger each cryo explosion faster (since you have to trigger each individually). Seeing that recharge speed evolution has a rather insignificant effect on the total recharge speed, I would generally go with burning damage. Finally, I take freeze combo since the Snap Freeze-Incinerate combo is this build's signature move.
Speaking of that combo, let's move on to Snap Freeze. I take reach to give it some extra range, and the 15m range is actually greater than the animation would have you think. I take cryo explosion because the debuff is useful against all enemies, and because I make liberal use of Snap Freeze with this build so duration is unnecessary. Finally, I take damage & weakness, but there's a catch. Tech combo is what you're really looking for with this build because Snap Freeze primes shielded, armored, and unprotected targets for Cryo Explosions (unlike Cryo Blast which only primes unprotected targets). You'll be chaining Cryo Explosions like crazy, and so the extra 100% damage seems like the natural choice. However, this extra 100% damage is inherent to Snap Freeze, likely the result of a glitch. Basically, you get both evolution 6 perks with this build, allowing you to debuff armor and create powerful tech explosions.
This build works extremely well with a Novaguard or a Slayer. Have the host play as one of these Vanguards while one or more players use the Paladin and spam Snap Freeze. The Vanguard can use Biotic Charge, Nova, and/or Phase Disruptor to trigger Cryo explosions. If done correctly, you'll unleash an endless chain of Cryo explosions on your enemies.
The main purpose of your passive abilities is capacity, since a good cooldown is key to this build. However, you can choose to mix and match a little if you prefer. For Shield Mastery, I take durability as the obvious choice. If you think you need the extra shield recharge speed, swap out rank 4 of your passive. If you want to take Fire Shield for melee tech combos, which is actually quite viable, then you can completely forgo N7 Paladin training.
The great thing about having fire shield is that your shield bash will prime the target for a fire explosion that can be immediately triggered with one of your powers (preferably Incinerate or Energy Drain, as Snap Freeze will cause the Fire Explosion to detonate on your character). Think of this combo like the Fury's Annihilation Field-Throw combo. Fire shield has no priming cooldown, so if you have a teammate triggering your fire explosions, just keep bashing the target and watch the fireworks.
I have heard about a lot of bugs surrounding this character, and so Tech combos may not always work as intended. For example, any tech combo triggered by Snap Freeze will detonate on your character because of the game mechanics (the explosion detonates on you because Snap Freeze is centered from your character). For the record, cryo shield does not weaken enemy armor as intended. However, it can freeze Phantoms solid. That could potentially be fun. Pro-tip: your heavy and light melee can block damage. Try timing your light melee against a Banshee warp if you want to feel like a total badass.
Completely outdated, unnecessary, and tasteless quote from the old guide:
"With the Snap Freeze/cryo shield combo, even the toughest of armored enemies are stripped of their protection and left naked and whimpering in the harsh cold.
Platinum gameplay brought to you by INVADERONE.
Gameplay by Stentron.
Subscribe to:
Posts (Atom)